Getting Started on Windows via WSL
How to get the code running using Windows Subsystem for Linux and Visual Studio Code
This guide is based off the main Getting Started guide for macOS and Linux, which you may refer to as needed.
While the repository contains a
uv.lockfile, this is currently experimental and not supported. In the future this will change, but for now, avoid trying to useuvwith this project.
1. Install WSL and Ubuntu
Follow the Microsoft guide to install Windows Subsystem for Linux: https://learn.microsoft.com/en-us/windows/wsl/install-manual
It is important that you complete every step of their guide, otherwise you may encounter issues during the next steps below.
A fresh Linux installation is recommended for Monty. If desired, you may attempt to re-use an existing Linux installation, but be aware you might run into GPU-related errors if default libraries and settings were significantly altered.
Regarding the Linux distribution, Ubuntu 24.04 LTS is recommended. Once installed, its filesystem can directly be accessed via the "Linux" section in the Windows File Explorer, which should normally point to \\wsl.localhost\Ubuntu-24.04\ or \\wsl$\Ubuntu-24.04\
If you plan on using Git for Windows on the WSL filesystem, Git might return an error saying
unsafe repository (\\wsl... is owned by someone else)since it's a network share, which you can bypass by entering this command on Windows in PowerShell or CMD or Git Bash:git config --global --add safe.directory "*"
2. Install Miniconda
Monty requires Conda to install its dependencies. For WSL, Miniconda is recommended.
To download and install Miniconda, follow this guide using the Ubuntu terminal: https://www.anaconda.com/docs/getting-started/miniconda/install#linux-2
3. Get the Code
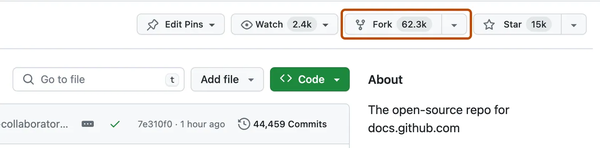
It is best practice (and required if you ever want to contribute code) first to make a fork of our repository and then make any changes on your local fork. To do this you can simply visit our repository and click on the fork button as shown in the picture below. For more detailed instructions see the GitHub documentation on Forks.
Next, you need to clone the repository onto the system. To do that, enter the following command in the Ubuntu terminal, adjusting YOUR_GITHUB_USERNAME accordingly:
git clone https://github.com/YOUR_GITHUB_USERNAME/tbp.monty ~/tbp
For more details see the GitHub documentation on cloning.
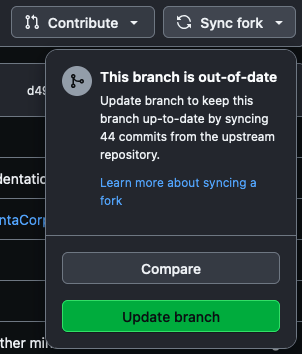
3.1 Make Sure Your Local Copy is Up-to-Date
If you just forked and cloned this repository, you may skip this step, but any other time you get back to this code, you will want to synchronize it to work with the latest changes.
To make sure your fork is up to date with our repository you need to click on Sync fork -> Update branch in the GitHub interface. Afterwards, you will need to get the newest version of the code into your local copy by running git pull inside this folder.
You can also update your code using the terminal by calling git fetch upstream; git merge upstream/main. If you have not linked the upstream repository yet, you may first need to call:
git -C ~/tbp remote add upstream https://github.com/thousandbrainsproject/tbp.monty.git
4. Set up Your Environment
Next, set up the conda environment for Monty. In the Ubuntu terminal, enter this:
cd ~/tbp
conda tos accept && conda env create && conda init && \
conda activate tbp.monty
This might take a few minutes or more to run, depending on your download speed.
Avoid manually installing or updating Habitat-Sim.
conda env createwill automatically install the required version.
By default, Conda will activate the base environment when you open a new terminal. If you'd prefer to have the Monty environment active by default, enter this:
conda config --set default_activation_env tbp.montyAlso, if you want the
~/tbpfolder active by default when opening the Ubuntu terminal, enter this:echo '[ "$PWD" = "$HOME" ] && cd tbp' >> ~/.bashrc
Then, install libopengl0 to allow running Habitat-Sim:
sudo apt -y install libopengl0
Don’t install Linux GPU drivers in WSL, you don’t need them, NVIDIA even warns against installing them.
5. Download Monty datasets
A lot of our current experiments are based on the YCB dataset which is a dataset of 77 3D objects that we render in habitat. To download the dataset, enter this:
python -m habitat_sim.utils.datasets_download --uids ycb --data-path ~/tbp/data/habitat
You can also get the Pretrained Models for inference testing:
mkdir -p ~/tbp/results/monty/pretrained_models/ && cd "$_"
curl -L https://tbp-pretrained-models-public-c9c24aef2e49b897.s3.us-east-2.amazonaws.com/tbp.monty/pretrained_ycb_v12.tgz | tar -xzf -
Optionally, you can get the Monty-Meets-World datasets for real-world testing:
mkdir -p ~/tbp/data/ && cd "$_"
curl -L https://tbp-data-public-5e789bd48e75350c.s3.us-east-2.amazonaws.com/tbp.monty/numenta_lab.tgz | tar -xzf -
curl -L https://tbp-data-public-5e789bd48e75350c.s3.us-east-2.amazonaws.com/tbp.monty/worldimages.tgz | tar -xzf -
and the Omniglot dataset:
sudo apt -y install unzip
mkdir -p ~/tbp/data/ && cd "$_"
git clone https://github.com/brendenlake/omniglot.git && cd omniglot/python
unzip images_background.zip && unzip strokes_background.zip
5.1. [Optional] Set Environment Variables
MONTY_MODELS
If you did not save the pre-trained models in the ~/tbp/results/monty/pretrained_models/ folder, you will need to set the MONTY_MODELS environment variable.
export MONTY_MODELS=/path/to/your/pretrained/models/dir
This path should point to the pretrained_models folder that contains the pretrained_ycb_v12 folders.
MONTY_DATA
If you did not save the data (e.g., YCB objects) in the ~/tbp/data folder, you will need to set the MONTY_DATA environment variable.
export MONTY_DATA=/path/to/your/data
This path should point to the data folder, which contains data used for your experiments. Examples of data stored in this folder are the habitat folder containing YCB objects, the worldimages folder containing camera images for the 'Monty Meets Worlds' experiments, and the `omniglot' folder containing the Omniglot dataset.
MONTY_LOGS
If you would like to log your experiment results in a different folder than the default path (~/tbp/results/monty/) you need to set the MONTY_LOGS environment variable.
export MONTY_LOGS=/path/to/log/folder
WANDB_DIR
We recommend not saving the wandb logs in the repository itself (default save location). If you have already set the MONTY_LOGS variable, you can set the directory like this:
export WANDB_DIR=${MONTY_LOGS}/wandb
6. Prepare VS Code
Install VS Code for Windows: https://code.visualstudio.com/download
Install the WSL extension: https://marketplace.visualstudio.com/items?itemName=ms-vscode-remote.remote-wsl
Install the Python extension: https://marketplace.visualstudio.com/items?itemName=ms-python.python
Install the Ruff extension: https://marketplace.visualstudio.com/items?itemName=charliermarsh.ruff
From Ubuntu, initialize the settings file for the repo:
mkdir -p ~/tbp/.vscode/ && echo '{ "python.defaultInterpreterPath": "~/miniconda3/envs/tbp.monty/bin/python", "python.testing.pytestEnabled": true, "python.testing.pytestArgs": ["tests"] }' > ~/tbp/.vscode/settings.json
Still from Ubuntu, enter this to launch VS Code with Monty:
cd ~/tbp && code .
The code . command launches both VS Code for Windows and the Linux VS Code Server directly into the current directory of WSL.
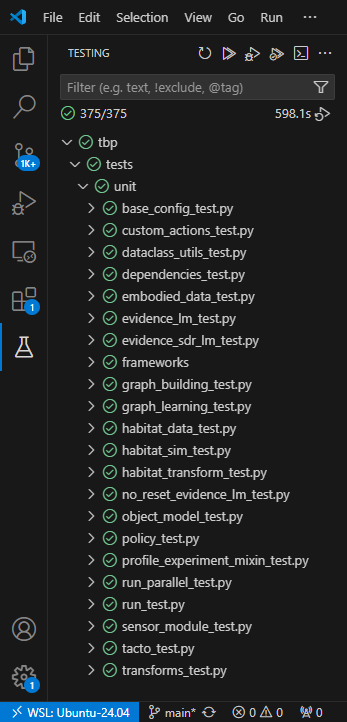
7. Run unit tests and a benchmark
If you followed all the previous steps, normally you should have VS Code open on the Monty project, ready to go. Try running the unit tests:
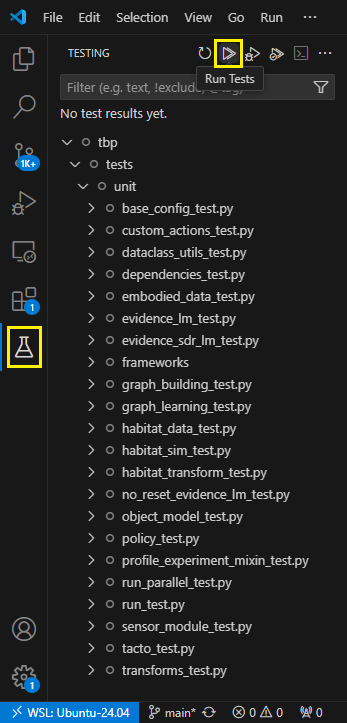
This will take some time, about 10 minutes on an 8-core i7-11700K for example:
Finally, let’s run a benchmark. You can do this in either the Ubuntu terminal or directly in the VS Code terminal. In the VS Code top menu, select Terminal > Open Terminal, then enter:
python run.py experiment=base_config_10distinctobj_dist_agent
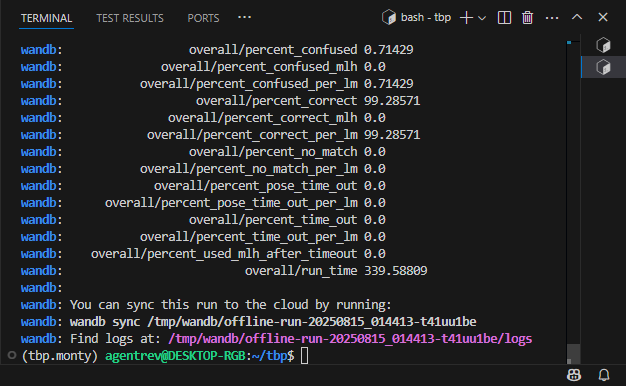
In this case, it took a little over 5 minutes:
8. What Next?
A good next step to get more familiar with our approach and the Monty code base is to go through our tutorials. They include follow-along code and detailed explanations on how Monty experiments are structured, how Monty can be configured in different ways, and what happens when you run a Monty experiment.
If you would like to contribute to the project, you can have a look at the many potential ways to contribute, particularly ways to contribute code.
You can also have a look at the capabilities of Monty and our project roadmap to get an idea of what Monty is currently capable of and what features our team is actively working on.
If you run into any issues or questions, please head over to our Discourse forum or open an Issue. We are always happy to help!
Help Us Make This Page Better
All our docs are open-source. If something is wrong or unclear, submit a PR to fix it!
Updated 3 months ago