Using Monty in a Custom Application
This is an Advanced Tutorial
If you've arrived at this page and you're relatively new to Monty, then we would recommend you start by reading some of our other documentation first. Once you're comfortable with the core concepts of Monty, then we think you'll enjoy learning about how to apply it to custom applications in the following tutorial!
Introduction
Monty aims to implement a general-purpose algorithm for understanding and interacting with the world. It was designed to be very modular so that the same Monty configuration can be tested in many different environments and various Monty configurations can be compared in the same environment. Up to now, the tutorials have demonstrated Monty in a simulated environment (HabitatSim) where a sensor explores 3D objects and recognizes their ID and pose. Here, we will show you how to use Monty in other environments.
What Kind of Applications can Monty Be Used For?
Monty is a sensorimotor modeling system. It is NOT made for learning from static datasets (although some can be framed to introduce movement, such as the Omniglot example below). Any application where you want to use Monty should have some concept of movement and how movement will change the state of the agent and what is being observed.
Monty Currently Expects Movement to be in 3D Euclidean Space
In the current implementation, movement should happen in 3D (or less) space and be tracked using Euclidean location coordinates. Although we are convinced that the basic principles of Monty will also apply to abstract spaces (potentially embedded in 3D space) and we know that the brain uses different mechanisms to encode space, the current implementation relies on 3D Euclidean space.
Customizing Monty for Your Application
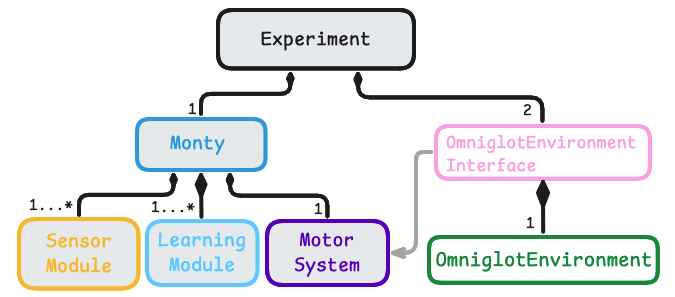
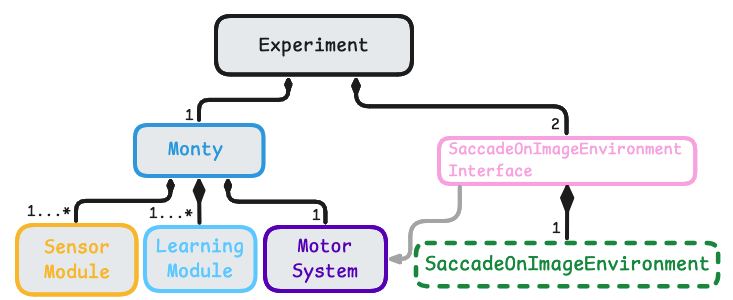
The diagram below shows the base abstract classes in Monty. For general information on how to customize those classes, see our guide on Customizing Monty. The Experiment class coordinates the experiment (learning and evaluation). It initializes and controls Monty and the environment and coordinates the interaction between them. The environment that implements the Environment protocol is wrapped in an experiment's environment Interface subclass, which exposes methods to interact with the environment. An experiment can have two environment interfaces associated with it: one for training and one for evaluation.
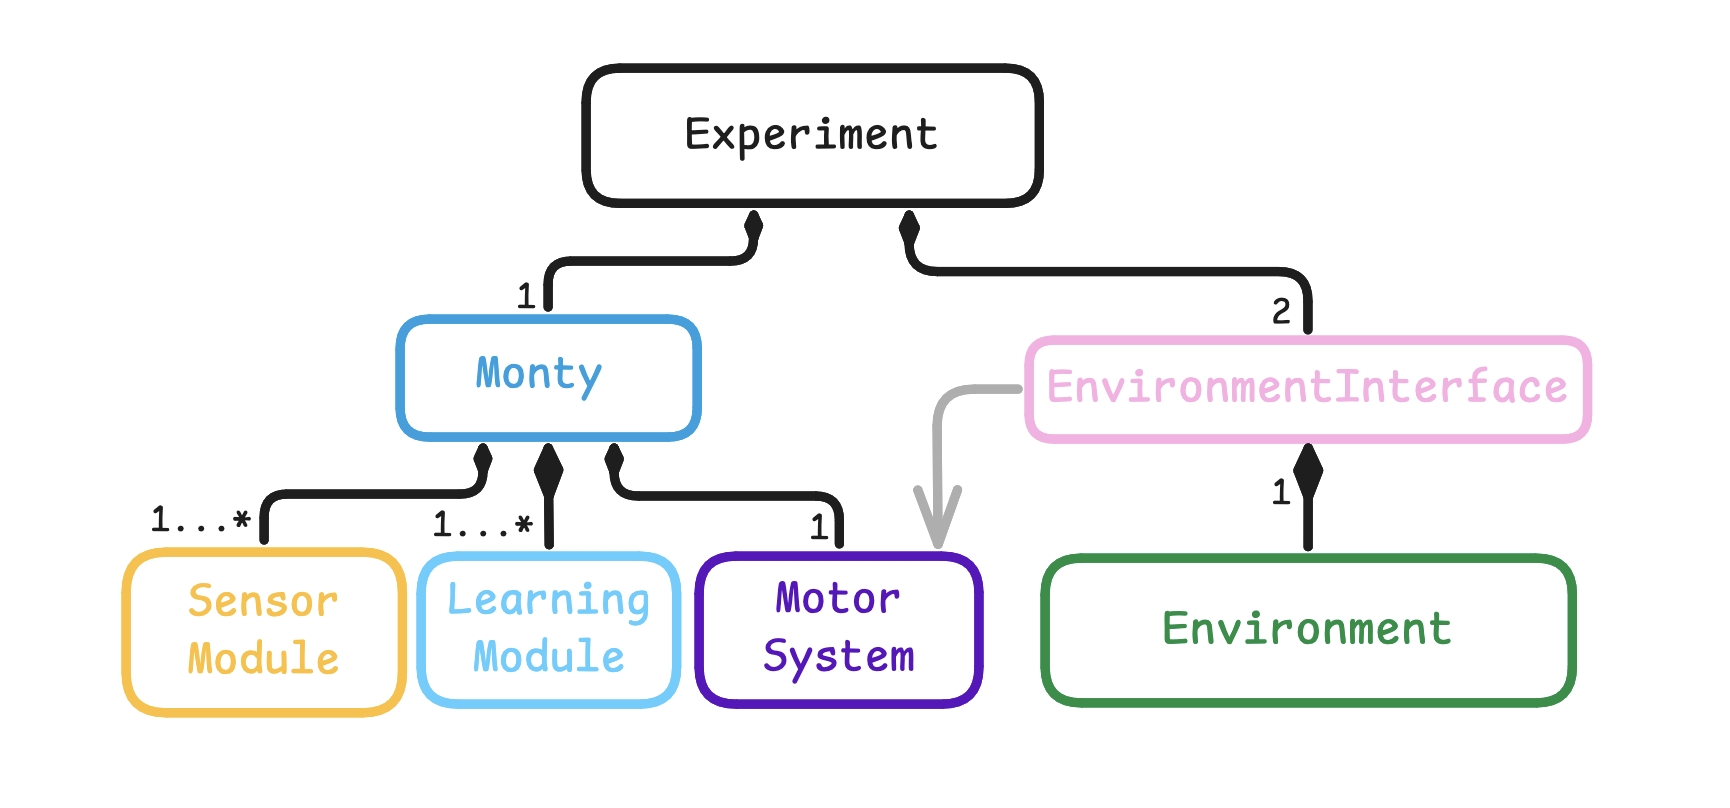
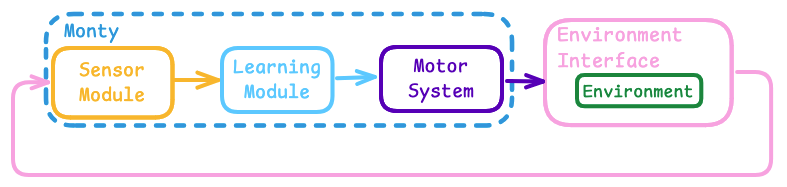
Information flow in Monty implements a sensorimotor loop. Observations from the environment are first processed by the sensor module. The resulting CMP-compliant output is then used by the learning modules to model and recognize what it is sensing. The learning modules can suggest an action (GoalState) to the motor system at each step. The motor system decides which action to execute and translates it into motor commands. The environment interface then uses this action to extract the next observation from the environment. The next observation is sent to the sensor module(s) and the loop repeats.
Additionally, the environment Interface can implement specific functions to be executed at different points in the experiment, such as resetting the agent position and showing a new object or scene at the beginning of a new episode.
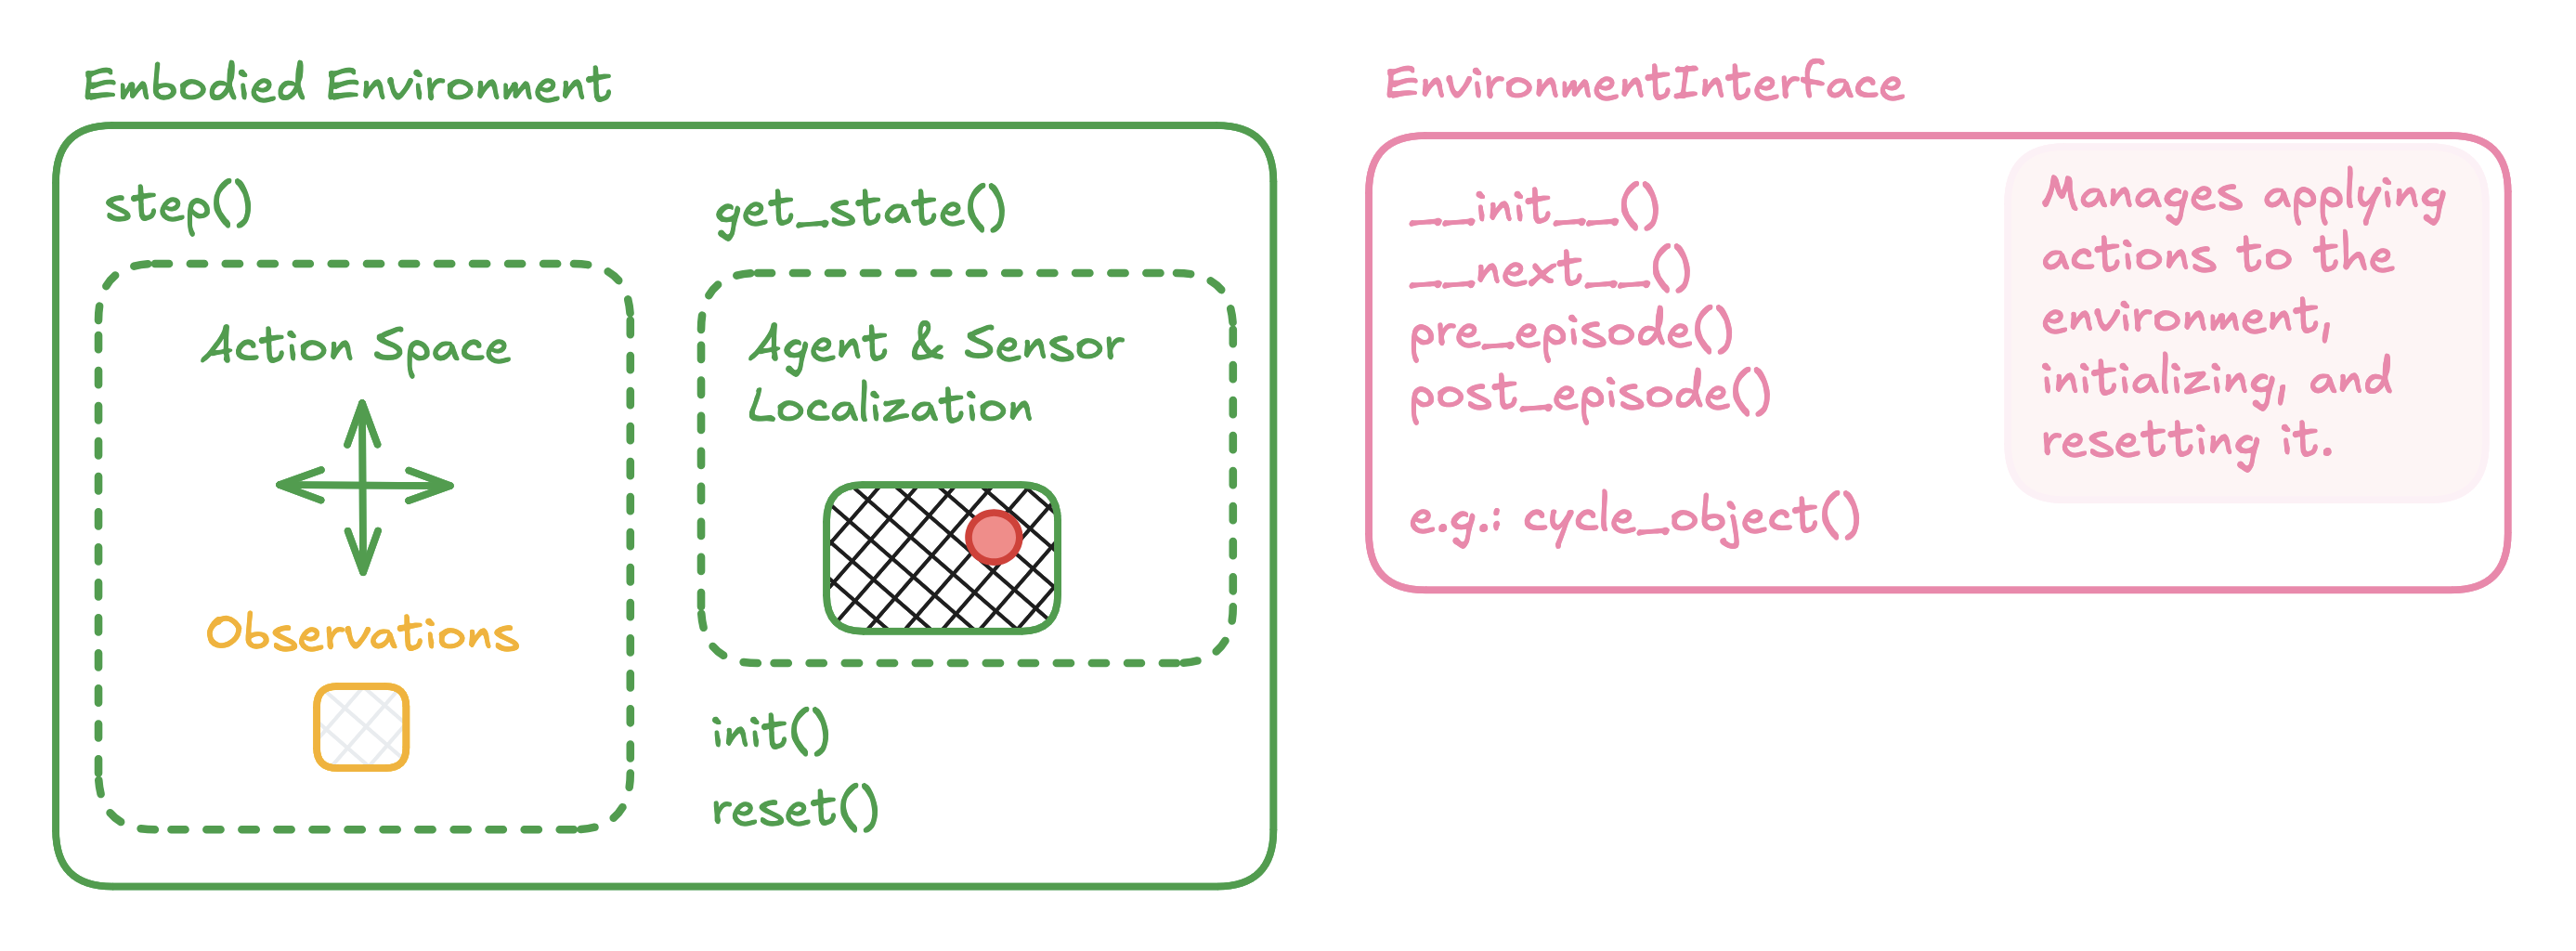
To use Monty in a custom environment, you usually need to customize the environment Interface class and write a custom implementation of the SimulatedObjectEnvironment protocol. For example, if you look back at the previous tutorials, you will see that for those Habitat experiments, we've been using the OneObjectPerEpisodeInterface and the HabitatEnvironment. The diagram below shows some key elements that need to be defined for these two classes. It's best to start thinking about the environment setup first, as this will force you to think through how to structure your application correctly for Monty to tackle.
Environment
The first thing to figure out is how movement should be defined in your environment. What actions are possible, and how do these actions change the agent's state and observations?
If you are working with an existing environment, such as one used for reinforcement learning (for example, the Habitat environment we are using), you might just need to wrap this into the .step() function of your custom Environment class such that when env.step(actions) is called, observations and proprioceptive state are returned. If you work with an application that isn't already set up like that, defining how actions lead to the next observation may be more involved. You can look at the environment OmniglotInterface or SaccadeOnImageInterface as examples (more details below).
The observations should be returned as Observations with one entry per agent in the environment. Each agent should have SensorObservations for each of its sensors. For example, if there is one agent with two sensors that each sense two types of modalities, it would look like this:
obs = Observations(
  {
    AgentID("agent_id_0"): AgentObservations(
      {
        SensorID("patch_0"): SensorObservations(
          {
            "depth": depth_sensed_by_patch_0,
            "rgba": rgba_sensed_by_patch_0
          }
        ),
        SensorID("patch_1"): SensorObservations(
          {
            "depth": depth_sensed_by_patch_1,
            "semantic": semantic_sensed_by_patch_1
          }
        )
      }
    )
  }
)
Related to defining how actions change observations, you will also need to define how actions change the state of the agent. The returned proprioceptive state needs to be a ProprioceptiveState(Dict[str, AgentState]) with an entry per agent in the environment. The entry should contain the agent's position and orientation relative to some global reference point (AgentState). For each sensor associated with that agent, a SensorState should contain the sensor's position and orientation relative to the agent.
For example, if you have one agent with two sensors, the proprioceptive state could look like this:
state = ProprioceptiveState(
  {
    AgentID("agent_id_0"): AgentState(
      {
        "position": current_agent_position,
        "rotation": current_agent_rotation,
        "sensors":
        {
          SensorID("patch_0"): SensorState(
            {
              "position": current_patch_0_sensor_position
              "rotation": current_patch_0_sensor_rotation
            }
          ),
          SensorID("patch_1"): SensorState(
            {
              "position": current_patch_1_sensor_position
              "rotation": current_patch_1_sensor_rotation
            }
          ),
        }
      }
    )
  }
)
Lastly, you need to define what happens when the environment is initialized (__init__()), when it is reset (reset(), usually at the end of an episode), and when it is closed (close(), at the end of an experiment). Resetting could include loading a new scene, resetting the agent position, or changing the arrangement of objects in the environment. It might also reset some of the environment's internal variables, such as step counters. Note that, as customary for RL environments, the reset() method is also expected to return Observations and ProprioceptiveState.
Environment Interface
The environment Interface manages retrieving observations from the Environment-given actions. The Environment, in turn, applies basic transforms to the raw observations from the environment.
The environment Interface should define all the key events at which the environment needs to be accessed or modified. This includes initializing the environment (__init__()), retrieving the next observation from the environment (step()), and things that happen at the beginning or end of episodes and epochs (pre_episode(), post_episode(), pre_epoch(), post_epoch()). Note that not all of those are relevant to every application.
Think about how your experiment should be structured. What defines an episode? What happens with the environment at the beginning or end of each episode? What happens at the beginning or end of epochs? Does anything need to happen at every step besides retrieving the observation and environment state?
Example 1: Omniglot
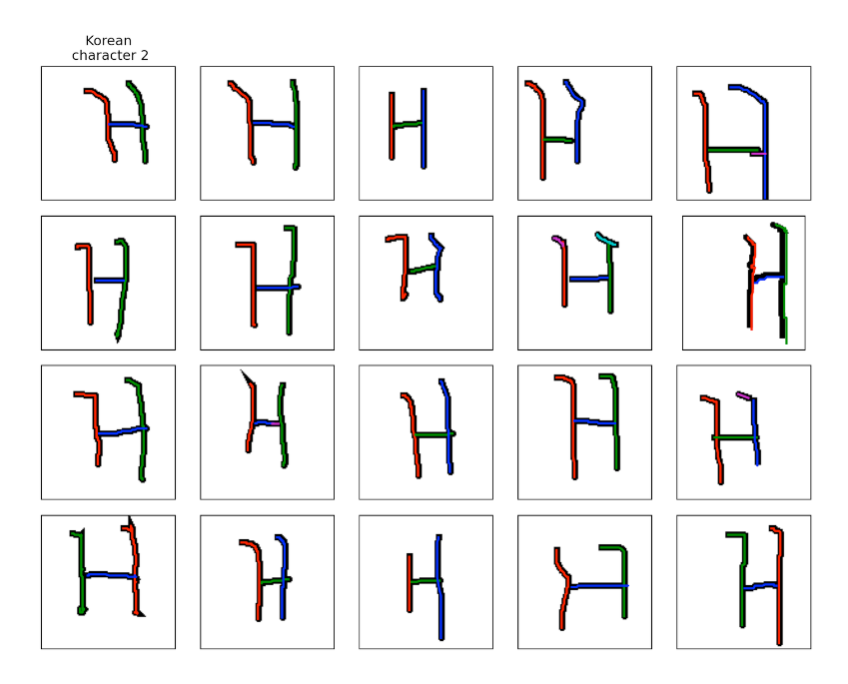
As one of Monty's strengths is the ability to learn from small amounts of data, one interesting application is the Omniglot dataset. It contains drawings of 1623 characters from 50 alphabets. Each of the characters is drawn 20 times by different people, as shown below.
Since this is a static dataset, and Monty is a sensorimotor learning system, we first have to define how movement looks on this dataset. A sensor module in Monty always receives a small patch as input and the learning module then integrates the extracted features and locations over time to learn and infer complete objects. So, in this case, we can take a small patch on the character (as shown on the right in the figure below) and move this patch further along the strokes at each step. Following the strokes is easy in this case as the Omniglot dataset also contains the temporal sequence of x,y, and z coordinates in which the characters were drawn (the example image above is colored by the order in which the strokes were drawn but also within each stroke we have access to the temporal sequence in which it was drawn). If this information were unavailable, the patch could be moved arbitrarily or use heuristics such as following the sensed principal curvature directions.
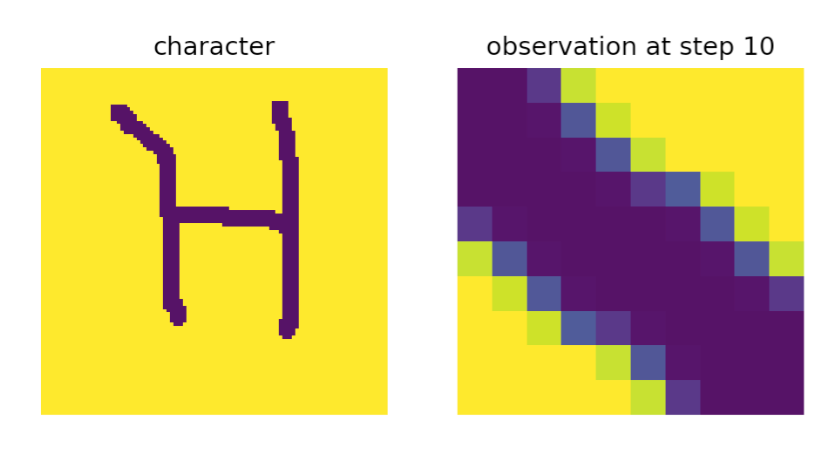
At each step, the sensor module will extract a location and pose in a common reference frame and send it to the learning module. To define the pose at each location, we extract a surface normal and two principal curvature directions from a gaussian smoothed image of the patch. As you can see in the images below, the surface normal will always point straight out of the image (as this is a 2D image, not a 3D object surface) and the first principal curvature direction aligns with the stroke direction while the second one is orthogonal to it. The learning module then stores those relative locations and orientations in the model of the respective character and can use them to recognize a character during inference.

Learning and inference on Omniglot characters can be implemented by writing two custom classes, the OmniglotEnvironment and the OmniglotInterface:
OmniglotEnvironment:- Defines initialization of all basic variables in the
__init__(patch_size, data_path)method. - In this example, Monty has no choice in how to move. The step method just returns the next observation by following the predefined stroke order in the dataset. Note this will still be formulated as a sensorimotor task, as the retrieval of the next observation corresponds to a (pre-defined) movement and we get a relative displacement of the sensor.
- Defines the
step(actions)method, which uses the currentstep_numin the episode to determine where we are in the stroke sequence and extracts a patch around that location. It then returns a Gaussian smoothed version of this patch as the observation and the x, y, z location on the character (z is always zero since we are in 2D space here). - Defines
reset()to reset thestep_numcounter and return the first observation on a new character. - Helper methods such as
switch_to_objectandload_new_character_datato load a new characterget_image_patch(img, loc, patch_size)to extract the patch around a given pixel locationmotor_to_locationsto convert the movement information from the Omniglot dataset into locations (pixel indices) on the character image
- Defines initialization of all basic variables in the
OmniglotInterface:- Defines initialization of basic variables such as episode and epoch counters in the
__init__method. - Defines the
post_episodemethod, which callscycle_objectto call the customizedOmniglotEnvironment'sswitch_to_objectmethod. Using the episode and epoch counters, it keeps track of which character needs to be shown next.
- Defines initialization of basic variables such as episode and epoch counters in the
An experiment config for training on the Omniglot dataset can then look like this:
# @package _global_

defaults:
  - /monty: graph_exp1000_emin_t3_tot2500
  - /monty/motor_system_config: informed_random_walk_1
  - /monty/learning_module: displacement_1lm
  - /monty/sensor_module: camera_dist_omniglot_tutorial
  - /monty/connectivity: 1lm_1sm
  - /environment: two_d_data_omniglot
  - /env_interface: train_omniglot
  - /env_interface/transform: depthto3d_sensor1
  - /logging: silent_warning_train

experiment:
  _target_: tbp.monty.frameworks.experiments.pretraining_experiments.MontySupervisedObjectPretrainingExperiment
  config:
    show_sensor_output: false
    max_train_steps: 1000
    max_eval_steps: 500
    max_total_steps: 6000
    n_train_epochs: 1
    n_eval_epochs: 3
    model_name_or_path: ""
    min_lms_match: 1
    seed: 42
    supervised_lm_ids: all
    logging:
      run_name: omniglot_training
One noteworthy highlight would be the - /env_interface: train_omniglot environment interface setup:
# @package experiment.config

do_train: true
train_env_interface_args:
  # Train on the first version of each character (there are 20 drawings for each
  # character in each alphabet, here we see one of them). The configuration specifies
  # alphabets = [0, 0, 0, 1, 1, 1] and characters = [1, 2, 3, 1, 2, 3]) so in the first
  # episode we will see version 1 of character 1 in alphabet 0, in the next episode
  # version 1 of character 2 in alphabet 0, and so on.
  alphabets:
  - 0
  - 0
  - 0
  - 1
  - 1
  - 1
  characters:
  - 1
  - 2
  - 3
  - 1
  - 2
  - 3
  versions:
  - 1
  - 1
  - 1
  - 1
  - 1
  - 1
train_env_interface_class: ${monty.class:tbp.monty.experiment.environment.OmniglotInterface}
And a config for inference on those trained models could look like this:
# @package _global_

defaults:
  - /monty: evidencegraph_exp1000_e3_t3_tot2500
  - /monty/motor_system_config: informed_random_walk_5
  - /monty/learning_module: evidence_omniglot_tutorial
  - /monty/sensor_module: camera_dist_omniglot_tutorial
  - /monty/connectivity: 1lm_1sm
  - /environment: two_d_data_omniglot
  - /env_interface: eval_omniglot
  - /env_interface/transform: depthto3d_sensor1
  - /logging: tutorial_detailed_info_monty_runs

experiment:
  _target_: tbp.monty.frameworks.experiments.object_recognition_experiments.MontyObjectRecognitionExperiment
  config:
    show_sensor_output: false
    max_train_steps: 1000
    max_eval_steps: 500
    max_total_steps: 6000
    n_train_epochs: 3
    n_eval_epochs: 1
    model_name_or_path: ${path.expanduser:${oc.env:MONTY_MODELS}/omniglot/omniglot_training/pretrained/}
    min_lms_match: 1
    seed: 42
    supervised_lm_ids: []
    logging:
      run_name: omniglot_inference
Follow Along
To run the above experiment, you first need to download the Omniglot dataset. You can do this by running
cd ~/tbp/dataandgit clone https://github.com/brendenlake/omniglot.git. You will need to unzip theomniglot/python/images_background.zipandomniglot/python/strokes_background.zipfiles.
The above configurations are already included in Monty at src/tbp/monty/conf/experiment/tutorial/omniglot_training.yaml and src/tbp/monty/conf/experiment/tutorial/omniglot_inference.yaml.
You can run training by calling python run.py experiment=tutorial/omniglot_training and then run inference on these models by calling python run.py experiment=tutorial/omniglot_inference. You can check the eval_stats.csv file in ~/tbp/results/monty/projects/monty_runs/omniglot_inference/ to see how Monty did. If you copied the code above, it should have recognized all six characters correctly.
Generalization Performance on Omniglot is Bad Without Hierarchy
Note that we currently don't get good generalization performance on the Omniglot dataset. If you use
eval_env_interface_args.versions: [2, 2, 2, 2, 2, 2]in the inference config, which shows previously unseen versions of the characters, you will see that performance degrades a lot. This is because the Omniglot characters are fundamentally compositional objects (strokes relative to each other), and compositional objects can only be modeled by stacking two learning modules hierarchically. The above configs do not do this. Our research team is hard at work getting Monty to model compositional objects.
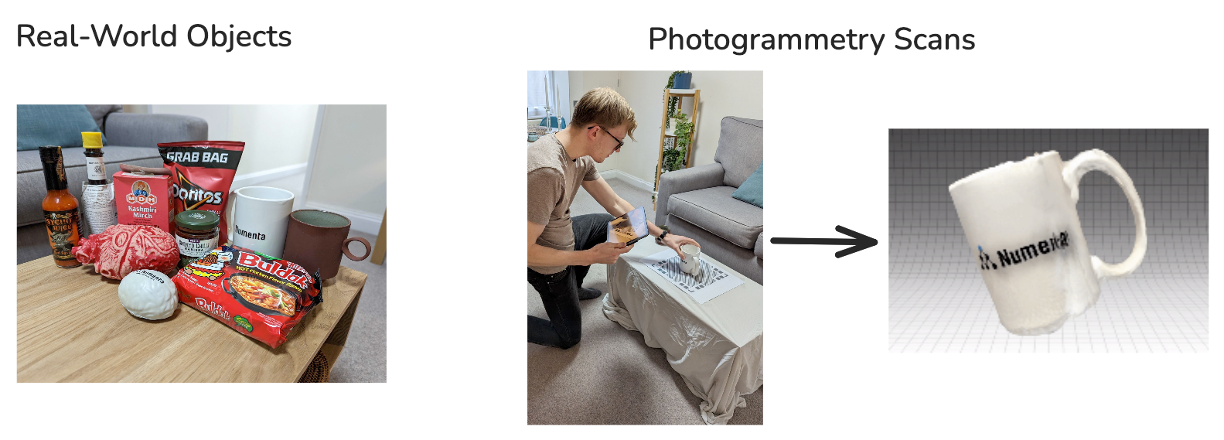
Example 2: Monty Meets World
Monty Meets World is the code name for our first demo of Monty on real-world data. For a video of this momentous moment (or is that Montymentous?), see our project showcase page.
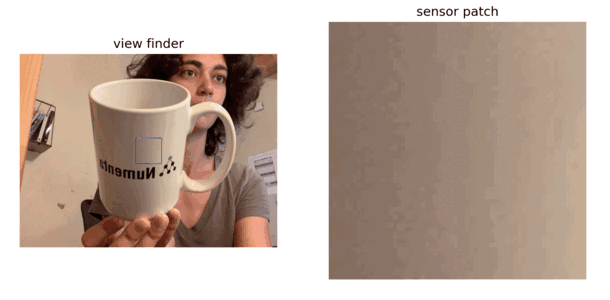
In this application we test Monty's object recognition skills on 2.5D images, which means a photograph that includes depth information (RGBD). In this case, the pictures are taken with the iPad's TrueDepth camera (the user-facing camera used for face recognition).
In this use case, we assume that Monty has already learned 3D models of the objects, and we just test its inference capabilities. For training, we scanned a set of real-world objects using photogrammetry, providing us with 3D models of the objects. You can find instructions to download this numenta_lab dataset here. We then render those 3D models in Habitat and learn them by moving a sensor patch over them, just as we do with the YCB dataset. We train Monty in the 3D simulator because in the 2D image setup, Monty has no way of moving around the object and, therefore, would have a hard time learning complete 3D models.
To run this pre-training yourself, you can use the only_surf_agent_training_numenta_lab_obj config. Alternatively, you can download the pre-trained models using the benchmark experiment instructions.
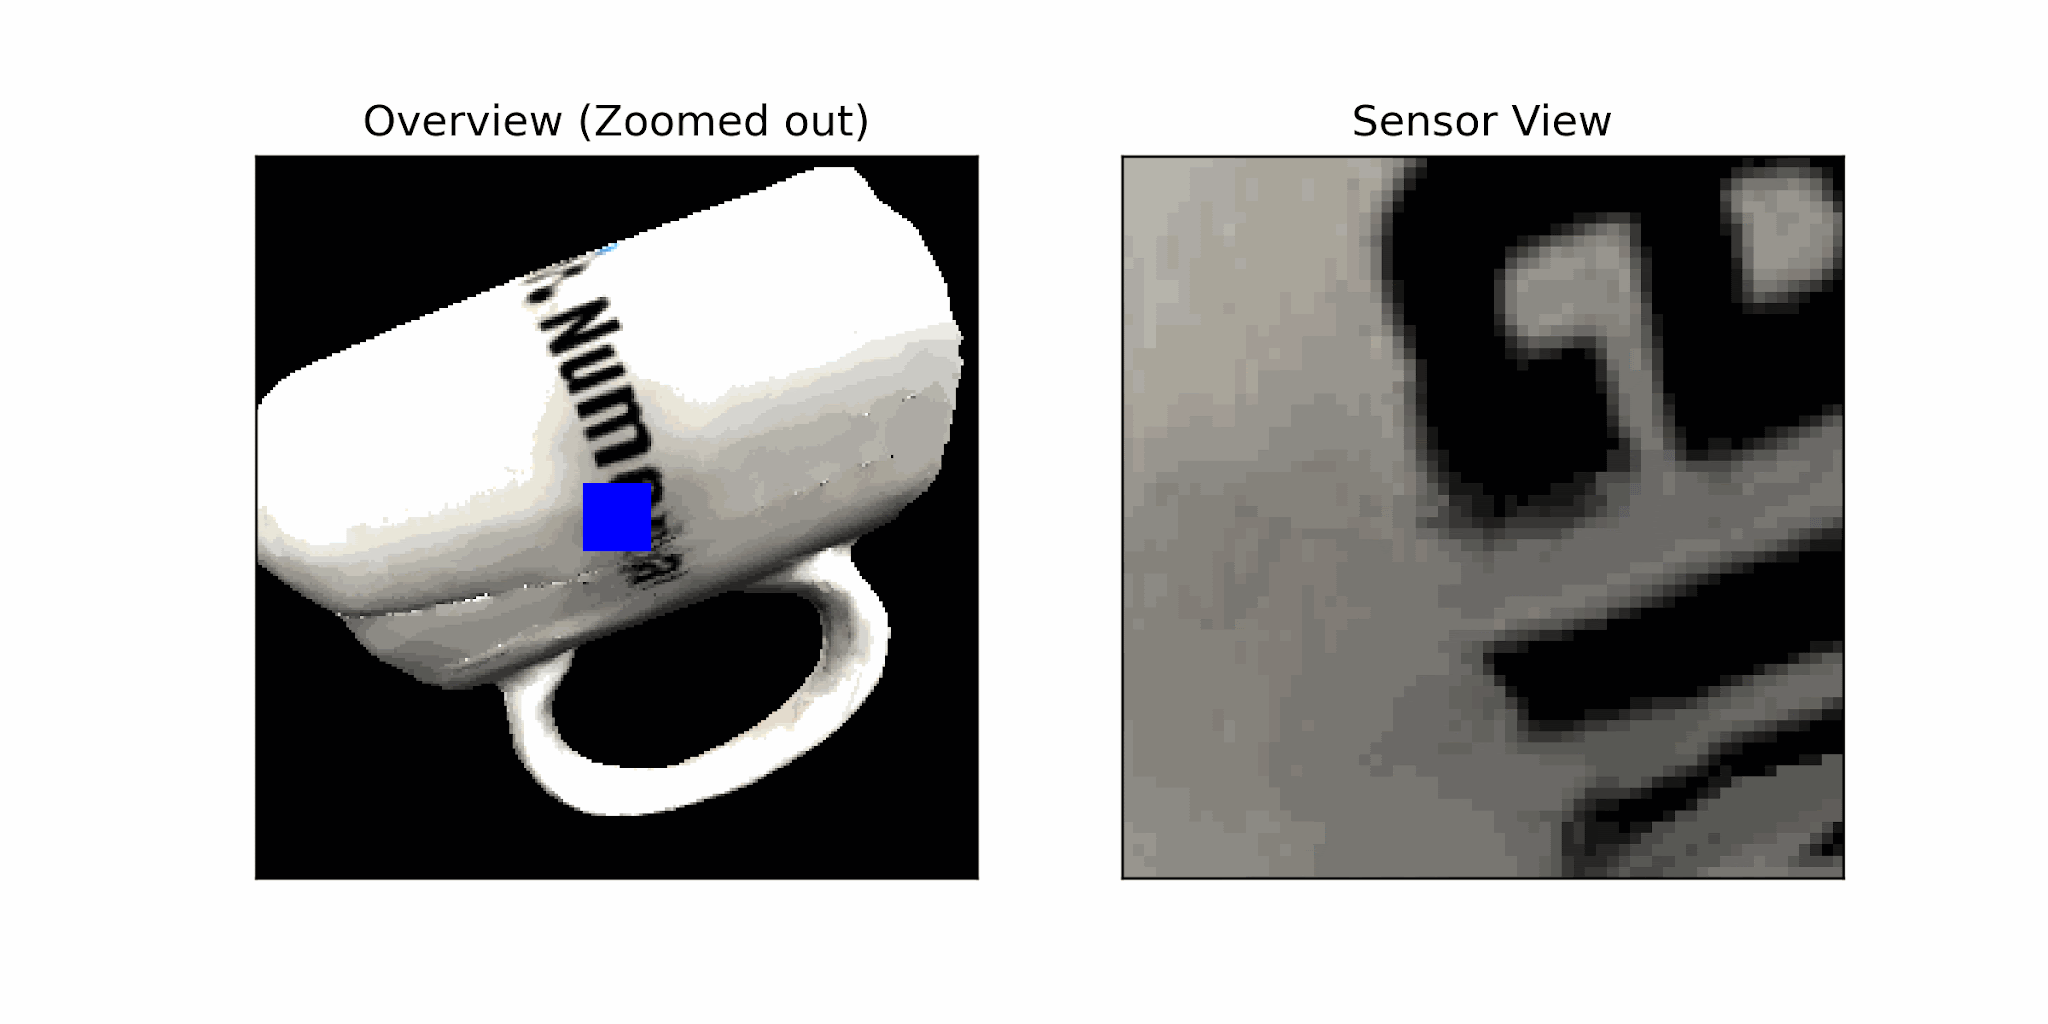
For inference, we use the RGBD images taken with the iPad camera. Movement is defined as a small patch on the image moving up, down, left, and right. At the beginning of an episode, the depth image is converted into a 3D point cloud with one point per pixel. The sensor's location at every step is then determined by looking up the current center pixel location in that 3D point cloud. Each episode presents Monty with one image, and Monty takes as many steps as needed to make a confident classification of the object and its pose.
This can be implemented using two custom classes the SaccadeOnImageEnvironment and SaccadeOnImageInterface:
-
SaccadeOnImageEnvironment:-
Defines initialization of all basic variables in the
__init__(patch_size, data_path)method. -
Defines the
step(actions)method, which uses the sensor's current location, the given actions, and their amounts to determine the new location on the image and extract a patch. It updatesself.current_locand returns the sensor patch observations and proprioceptive state. The proprioceptive state mostly containsself.current_locand placeholders for the orientation, as the sensor and agent orientation never change. -
Helper methods such as
switch_to_object(scene_id, scene_version_id)to load a new imageget_3d_scene_point_cloudto extract a 3D point cloud from the depth imageget_next_loc(action_name, amount)to determine valid next locations in pixel spaceget_3d_coordinates_from_pixel_indices(pixel_ids)to get the 3D location from a pixel indexget_image_patch(loc)to extract a patch at a location in the image.
These methods are all used internally within the
__init__, andstepmethods (except for theswitch_to_objectmethod, which is called by theSaccadeOnImageInterface).
-
-
SaccadeOnImageInterface:- Defines initialization of basic variables such as episode and epoch counters in the
__init__method. - Defines the
post_episodemethod, which callscycle_objectto call the environment'sswitch_to_objectmethod. Using the episode and epoch counters, it keeps track of which image needs to be shown next.
- Defines initialization of basic variables such as episode and epoch counters in the
An experiment config can then look like this:
# @package _global_

defaults:
  - /monty: graph_exp1000_emin_t3_tot2500
  - /monty/motor_system_config: informed_random_walk_20 # move 20 pixels at a time
  - /monty/learning_module: evidence_1lm_nn10_dod003_dts02_gsg0
  - /monty/sensor_module: camera_dist
  - /monty/connectivity: 1lm_1sm
  - /environment: two_d_data_standard
  - /env_interface: eval_worldimages
  - /env_interface/transform: none
  - /logging: basic_warning_wandb_evidence_eval_runs

experiment:
  _target_: tbp.monty.frameworks.experiments.object_recognition_experiments.MontyObjectRecognitionExperiment
  config:
    show_sensor_output: true
    max_train_steps: 1000
    max_eval_steps: 500
    max_total_steps: 6000
    n_train_epochs: 3
    n_eval_epochs: 1
    model_name_or_path: ${constants.pretrained_dir}/surf_agent_1lm_numenta_lab_obj/pretrained/
    min_lms_match: 1
    seed: 42
    supervised_lm_ids: []
    python_log_level: DEBUG
    logging:
      run_name: monty_meets_world_2dimage_inference
For more configs to test on different subsets of the Monty Meets World dataset (such as bright or dark images, hand intrusion, and multiple objects), you can find the RGBD image benchmark configs at:
- world_image_from_stream_on_scanned_model
- world_image_on_scanned_model
- dark_world_image_on_scanned_model
- bright_world_image_on_scanned_model
- hand_intrusion_world_image_on_scanned_model
- multi_object_world_image_on_scanned_model
Follow Along
To run this experiment, you first need to download our 2D image dataset called
worldimages. You can find instructions for this here.You will also need to download the pre-trained models. Alternatively, you can run pre-training yourself by running
python run.py experiment=only_surf_agent_training_numenta_lab_obj. Running pre-training requires the Habitat simulator and downloading thenumenta_lab3D mesh dataset.
To run the experiment, call python run.py experiment=tutorial/monty_meets_world_2dimage_inference. If you don't want to log to wandb, set the WANDB_MODE=disabled environment variable, or change to a logging configuration without any wandb handlers (i.e., set wandb_handlers: [] under the logging). If you just want to run a quick test on a few of the images, adjust the scenes and versions parameters in config.eval_env_interface_args.
Other Things You May Need to Customize
If your application uses sensors different from our commonly used cameras and depth sensors, or you want to extract specific features from your sensory input, you will need to define a custom sensor module. The sensor module receives the raw observations from the environment interface and converts them into the CMP, which contains features at poses. For more details on converting raw observations into the CMP, see our documentation on sensor modules.
If your application requires a specific policy to move through the environment or you have a complex actuator to control, you might want to implement a custom MotorSystem or MotorPolicy class. For more details on our existing motor system and policies, see our documentation on Monty's policies.
Writing those custom classes works the same way as it does for the environment Interface class. For general information, see our documentation on customizing Monty.
Conclusion
This tutorial was a bit more text than practical code. This is because every application is different, and we try to convey the general principles here. The first step for any application is to think about if and how the task can be phrased as a sensorimotor environment. What is Monty's action space? How is movement defined? How does it change observations? How do movement and sensation determine the sensor's location and orientation in space? This will then help you figure out how to define a custom Environment and Interface, and their associated __init__, step, reset, pre_episode, and post_episode methods. If you run into issues customizing Monty to your application, please come over to our Discourse Forum and ask for help!
Help Us Make This Page Better
All our docs are open-source. If something is wrong or unclear, submit a PR to fix it!
Updated 6 days ago